Tanis Galik is an award-winning crochet designer, an experienced teacher and author. Interlocking Crochet is her best-selling crochet book which explores a unique technique that creates a reversible crochet fabric. Tanis learned the basics of Interlocking Crochet™ at a class presented by James Walters and Sylvia Cosh. For the next 14 years she experimented with this technique – creating new designs and developing unique ways to use it. She is a member of the Crochet Guild of America (CGOA), and has a CGOA Master of Advanced Crochet Stitches and Techniques. She is published in crochet magazines, books and booklets. Free videos and workshops are available at YouTube.com Tanis Galik Playlists. Or visit SimpleAndSensational.com to learn basic crochet techniques and find more free patterns.
New IC Patterns & Designs
I’m pleased to announce that 5 new Interlocking patterns can be found under Free IC Patterns. These patterns include 2 baby blankets, a purse, a hat and a scarf.
Under IC New Designs you’ll find 8 single designs and 72 double designs with instructions. Pick one of the new designs to create your own project. It can be as simple as making round or square coasters.
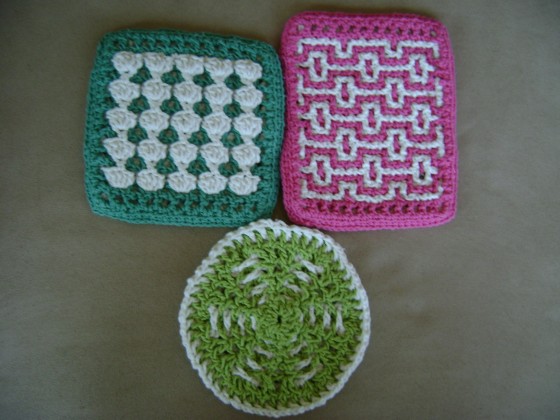
Use your stash to create colorful reversible placemats.

Or create something as complicated as a one-of-a-kind afghan using various reversible designs. (I’m afraid I created this one for a friend and did not write the pattern for it).
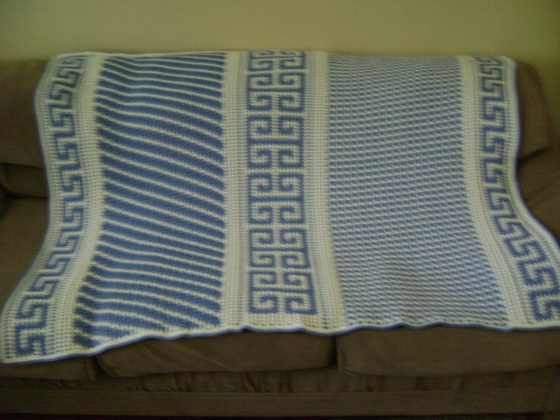
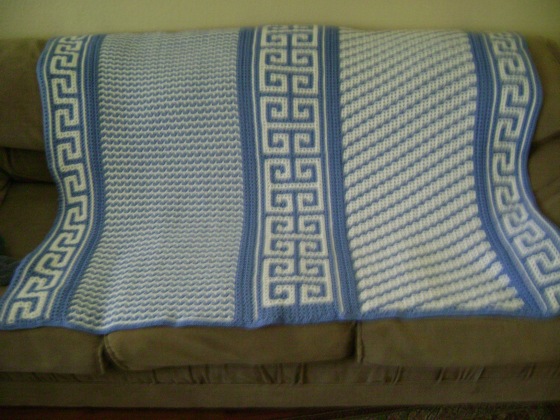
There are no limits to your creativity. Just enjoy!
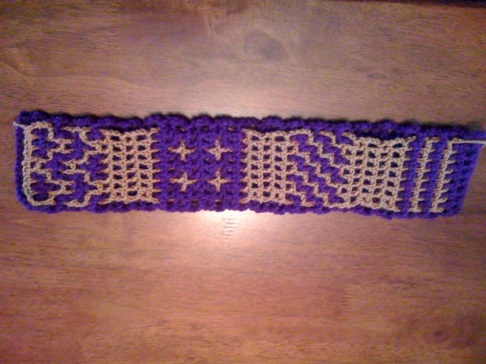
How to Balance an Interlocking Crochet Design – Top with Bottom Edge
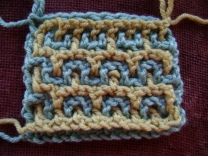
To balance a design panel you’ll want the ending top edge to match the beginning bottom edge. If they do not automatically match, you usually just have to add one plain mesh A-colored row of dcif or dcib to balance the design. However, sometimes you just have to experiment with the last row or two in order to complete a panel. For example the Castle Top design requires a little extra work.
After completing the 2 A-colored and B-colored rows to the length you want, return to the front side.
Drop B to the back
With A color work one row of dcib across.
With B color work one row of dcib across and drop B to the back.
Turn project around.
Work only one more A-colored row of dcib across.
You now have a balanced design and are ready to unite the edges.

If you need more instruction on how to execute the Interlocking Crochet technique, look at the written instructions and pictures on this website. Or I also have a video workshop demonstrating the technique and walking you through several of the designs at www.YouTube.com Tanis Galik Playlists.
Numbers Under Each Design – Helping You Create Your Own Projects
I’ve received a question regarding the meaning of the 6 sts + 6, 4 sts + 4, etc. found in Interlocking Crochet™ under each design. These numbers are for you to use when you are creating your own projects.
Subscribe to My Crochet Channel or go to: YouTube.com TanisGalik
This first number lets you know how many sts you’ll need in order to have a complete design. The second number is the additional sts needed to balance your design.
Say you are making a single-panel purse which you will just fold in half to create a pouch. You’ll choose the design you want to use.
To begin you’ll need to create a base or foundation chain. The pattern requires 6 sts (chains) for each complete design + 6 additional chains to balance the design. You determine the measurement you want your purse panel to be. Crochet a foundation chain to equal that measurement. To know if that foundation chain will give you a complete design, count the chains. For the design you have chosen, you need the chain to be divisible by 6 + add 6 more chains. If your chain currently has 50 sts, you’ll have to add 4 sts to make the design come out correctly. 6 X 8 = 48 + 6 = 54.
The purpose of these numbers is to help crocheters who wish to create their own projects easily figure out how many chains should be in their base or foundation chain from the start, avoiding wasted time and effort.
Of course, these numbers apply to the A foundation row only. Your B foundation row will always be 2 sts (or one box) shorter than the A foundation row.
I hope this explains these numbers.
The difference between the Zigzag Design and the Squiggles Design
What is the difference between the Zigzag Design and the Squiggles Design?
Subscribe to My Crochet Channel or go to: YouTube.com TanisGalik
They are close. The difference is in the B Rows.
In the Zigzag Design starting with Row 2 A & B (and in all following rows) each stitch is opposite of the stitch in the previous row (dcif is worked in a dcib of the previous row and dcib is worked in a dcif of the previous row).
In the Squiggles Design starting with Row 2 A (and in all following rows, it is the same as the A rows in the Zigzag Design. Each stitch is opposite of the stitch in the previous row (dcif is worked in a dcib of the previous row and dcib is worked in a dcif of the previous row).
The difference is in the Squiggles B rows. Starting in Row 2 B (and in all following rows) each stitch is the same as the stitch in the previous row (dcif is worked in a dcif of the previous row and dcib is worked in a dcib of the previous row).
How do I design my own unique, multi-paneled Interlocking Crochet™ afghan or baby blanket?
The best way to design your own multi-paneled Interlocking Crochet™ afghan or baby blanket is to make a sample. It’s not as hard or as time consuming as you might think. Actually since you’ll be able to see if the designs work together and catch any problems before you begin your project, it can actually save you time and effort.
Subscribe to My Crochet Channel or go to: YouTube.com TanisGalik
Start by choosing your designs. Take note of the statement – “This interlocking pattern works even over a multiple of # A-colored boxes.” Obviously, each design you use must work out mathematically with the other designs in your project. For example, if one design works evenly over 2 boxes and the other requires 4 boxes, you know you’ll be able to fit these together in adjacent panels.
However, if one design requires an odd number (4 + 1 A-colored boxes), then you’ll need to find another design, realize the even numbered design will not be centered perfectly or make some adjustments when working with the even numbered design (such as adding a plain box at the beginning or end of the even numbered rows) or just. You can work out these adjustments as you crochet your sample.
Don’t make the sample too large. Crochet a foundation mesh that will give you an adequate view of what the project will look like. For the designs requiring multiples of 2 boxes for the first panel, 4 boxes for the second panel and 2 boxes for the third panel, a foundation of 12 A-colored boxes should be sufficient.
Begin crocheting your first design. After one completion of the rows required to create that design, you’ll know how it will look and fit. You can make any adjustments needed for this design.
Add the first divider mesh rows. Carefully note: Are you working on the RS or WS? Do you drop the Color B to the back or front as you begin the row? Divider Row 1A is it dcib (worked in the back) or dcif (worked in the front)? Divider Row 1B is it dcib (worked in the back) or dcif (worked in the front)? Be sure to make these notations for each divider row until it is as wide as you wish, ending on WS.
Turn the entire piece and begin your next design. Continue adding the next divider and third panel in the same way as above until you are happy with your results.
Not only will you know how your afghan/baby blanket will look, you’ll uncover any problems or adjustments that need to be made before you have invested a lot of time or effort. You’ll also save yourself a lot of frustration by having a sample you know works instead of finding out in the middle of your project things just aren’t fitting together properly.
Color Choices for Interlocking Crochet™
I tend to pick colors with strong contrasts, especially working a warm shade with a cool shade or a bright color with a dark one. Colors you normally wouldn’t think to put together can make the most interesting combinations.
Subscribe to My Crochet Channel or go to: YouTube.com TanisGalik
In fact, I’ve found that if the hues are too close together, the design doesn’t pop. I made an afghan using a blue yarn and a green yarn that were the same depth of color. It was relaxing to look at, but the designs disappeared.
Unfortunately, I have to actually see the yarns next to each other to make a choice. Even a slight change in shade can make a big difference when pairing it with another color. That is the reason I have trouble buying yarn on the Internet. Even though there is a huge selection to choose from, the colors on my computer screen are usually not true to the actual colors. And as I said, a different shade can really make a big difference – and not in a good way.
Even when I’m familiar with a yarn (if it has a dye lot number), the color can change just enough between dye lots that it no longer works. What is the answer? For me it’s going to yarn stores and specialty shops that carry a wide selection of yarns or at least have yarn cards with actual samples of the yarn attached so I can feel the yarn and see the colors.
Buying yarn is a very tactile and visual experience. When I see a new color or touch a yarn that inspires me, that’s when I really want to get busy and start crocheting something special.
Teaching Interlocking Crochet™ to Others
If it is at all possible, bring a computer to your class or teaching session and show the free videos from the Interlocking Crochet™ website so people can watch the concept and the stitches up close before you assist them individually.
Subscribe to My Crochet Channel or go to: YouTube.com TanisGalik
I have found showing the videos before trying each step really helps others to see and understand what is actually happening. My first teaching experience with Interlocking Crochet™, I just explained the steps verbally and drew pictures on a board. It was hard for most people to understand and see what I was doing. However, when I switched to showing the video before explaining and helping everyone individually, it made a big difference.
First, I have them watch Step 1 – Mesh Foundation, then we work that step and I help each one individually. Those who are ready, move on to Step 2 – Working a DCIB or Back Stitch. They watch it and work on that step. Again, I am able to answer questions and check their work. When ready, individuals move on to Step 3 – Working a DCIF or Front Stitch. Step 4 – Zigzag Stitch helps them practice both stitches. Finally, there is the Uniting the A and B Sides into one fabric, showing how to finish your piece.
In this way everyone can learn at her/his own pace and will not feel pressured to keep up with those that understand it more quickly. Also, any time someone wants to review a step or stitch, it is available to watch as many times as they need from their home computers.
Yarn Choices for Interlocking Crochet™
I’ve received several questions about the yarns I use for Interlocking Crochet™. The terms differ depending on your county. However, if you know the hook size suggested for the yarn you want to use, it will help.
Subscribe to My Crochet Channel or go to: YouTube.com TanisGalik
The Coats nylon (www.coatsandclark.com) is described as 100% nylon crochet thread and uses a G-6/4mm hook. It seems to be equal to a fine/2 sports yarn. I would think any nylon thread that is comfortable with a G-6/4mm hook would work. I also have bought from a website (www.creativeyarnsource.com) that has some comparisons. The La Campana nylon is close to the Coats. Any cotton (or for that matter any yarn) that worked comfortably with a G-6/4mm hook could be used as the other yarn in the crocheting of the Two-Tone Business Tote found on page 93 of Interlocking Crochet™. An additional note about the creative yarn source website: it offers a vast choice of colors greatly expanding your options for any project in which you want to use nylon crochet thread.
As for the worsted yarn used in the Autumn Woods Scarf, page 88 of Interlocking Crochet™, the reason it worked so well is that it was made from baby alpaca – as light and as soft as can be. A normal worsted of acrylic and possibly even wool would be too heavy and stiff. What the yarn is composed of really makes a difference. A double knit could work well as long as it is a very soft yarn.
Also, if you use a hook larger than the recommended size, it will also loosen the stitch and make it softer and more flexible. Try a little sample and see how it feels near your skin and how flexible it is.
The baby blanket was made in an acrylic worsted/aran. However, I recently found Bernat Softee Baby (www.bernat.com) which is 100% acrylic and a very soft yarn. It is called light 3 which would be the same as the DK yarn. It uses a G/4mm hook, but I would still use an I-9/5.5mm hook because I want the blanket super soft. If it’s too soft for you, try a smaller hook.
Share Interlocking Crochet™ Pictures on Ravelry
Some crocheters are beginning to send me pictures of their Interlocking Crochet™ projects. Below are two from Interlocking Crocheter Lisa.
Subscribe to My Crochet Channel or go to: YouTube.com TanisGalik
Why not post your pictures so everyone can see them? First, join www.Ravelry.com. It’s free. Then you can post all your pictures in your “notebook”.
Also, you can share your photos and comments with a specific Interlocking Crochet™ group. There are currently two. Go to: Groups and type in Interlocking Crochet™. Join the group of your choice. After you post your pictures on your page, there is a pull-down menu that allows others in the group to see your photo on the group’s main page with a link to your project.
For help click on the ?. All the information on how to join a group, post your pictures and connect the pictures with your group can be found.
Why meet with local crafters?
I live in a small town. While visiting a local sanctuary for abandoned animals, the tour guide (knowing I’m a crocheter), asked if I could refer her to any spinners. They had just sheared their alpacas, sheep and other yarn-producing animals and they wanted to sell the “wool” at a large discount to someone who could process it further. Our community has many artists, including a very active quilting organization; however, I personally didn’t know any other yarn crafters. So I decided it was time to change that.
Recently the book store and the scrapbooking store have introduced yarn into their stocks. Since the scrapbooking store had a room for classes and parties, I decided to approach the owner with my idea. Kathi wanted to expand her yarn area and had already started to offer knitting and crochet classes. She liked my idea and we decided to name out gathering – Fiber Fun, to include all fiber enthusiasts – knitters, crocheters, spinners, needle crafters, etc. Her store is located in the center of the town, near various art galleries and antique stores. On the first Friday of each month from 5pm-8pm the gallery features different artists and holds a small reception. Other stores follow suit offering music and snacks to their visitors. We thought this would be the perfect time for our meeting also.
We added Fiber Fun to the local calendar and invited everyone we met. It has proved to be a very pleasant experience. Crafters bring their current projects, coming and going as they please. We even take a break to visit the other exhibits. Other guests stop by to see what is going on in our space.
Sharing projects and yarn knowledge has proved to be very beneficial for everyone involved. The more experienced crocheters help those that are learning, especially with reading patterns and then exchange ideas and techniques with each other.
At our last meeting, the knitters were making a ruffled boa-like scarf from a new-to-me Bernat’s mesh yarn. They were following the directions on the label. The crocheters wanted to make the same scarf, but there were no crochet instructions. As a result, I bought a few skeins and took them home. After some experimentation, I came up with three crocheted scarves using this yarn. (Two free patterns are available under Simple & Sensational: Afghan Ruffle Scarf and Double Crochet Ruffle scarf.) If it wasn’t for meeting with this group, I probably would never have thought to do this.
To look for an established group in your area check out the Crochet Guild of American (www.crochet.org). If there is none, why not take the initiative and start your own? Find a location, pick a convenient time and start inviting people. You’ll find this artistic association not only fun, but educational as well.
